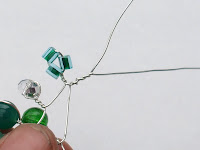
 STEP 2 - Use one length 26 gauge wire at a time. Leave tail of about 6 inches place on bead i usually use round one on wire.
 STEP 3 - Cross wires right under the bead as shown in the photo, then twist 3 times using thumb and forefinger.
STEP 4 - Twisted bead will be held in place on 26 gauge wire now. Take a finger space between this bead and the next one and do same mixing up beads and shapes as you go to create interest.
STEP 5 - Mix up seed beads and round beads the closer the beads the more wire you will use. Check length around your wrist you will need extra as you will intertwine the 2 strands later.
 STEP 6 - Repeat with other strand. Leave tails of 6" either end.
STEP 7 - Grasp two ends and make Y shape then twist with thumbs and forefingers about 1/2 "
STEP 8 - You need enough twisted wire to be able to make a loop with round nose pliers.
STEP 9 - Twist loop with round nose pliers and bring two ends around base of it to secure. (You could add lobster clasp at this point if you want to. so it is secured onto the loop and cannot come off.
STEP 9 - Plait and intertwine the two strands (careful not to overtwist or the wire will snap) and then the two ends by the twisted wire loop you will individually weave one at a time amongst beads until left with about 1" wire then use round nose pliers to create nice neat coil and tuck in amongst beads. Do this with all four ends.
STEP 9 - You will see i have added jump rings to the twisted wire loops you made and a mobius love knot (intertwined jump rings) and clasp to add some decoration to the bracelet.
You could make a necklace in the same way as this but longer length too and its great little project to use up all those little beads you have left over.
Time to make : approx 30 to 45 mins. Level Beginner to intermediate.
Thank you.


Just wonderful! Wire work beginners are going to love this one! Just featured it on my blog so others can come visit!
ReplyDeletehttp://www.beadinggem.com/2011/07/really-pretty-and-easy-twist-wire.html
hey great tute....thanks
ReplyDeleteI just came over from the Beading Gem's blog. Thanks for sharing the tutorial. I Love it!
ReplyDeleteNerissa
Thank you for your comments. Forgot to say that if you end up with bracelet too long you can simply twist wire bracelet around to get length you want so you can manipulate it and move beads a bit too to all face same way as you wear it.
ReplyDeleteJenny x
Hi, I love the look of this bracelet but I have a question on how to make it. After the first bead, I'm having trouble twisting the rest of the beads securely. Any tips on how to do this?
ReplyDeleteThanks
Hi Crookshanks. After the first bead is on i use my thumb as a spacer and place next bead thumb width apart from the first one. If you look at photo 1 with the next bead i put it on then pull the wires down either side of it like a "U" shape so it sits at top of the U then cross wires underneath using my thumb to pinch both wires under the bead and my right hand to twist the bead whilst holding it secure with my thumb of left hand. Sometimes the wire will wrap sort of sideways on the bead not straight on top which is fine as once you have all beads on they look intertwined anyway. Also you can manipulate the beads once finished and twist the bracelet to make it shorter. I used 26 gauge wire too.
ReplyDeleteHope that helps, see photo 1 you will do exactly same one thumb width apart from first bead.
x
It looks so nice! I'll definitely try it. Thank you for your tutorial!
ReplyDeletethis is so cute..thanks for sharing...and I so love your font......
ReplyDeleteLove it! Thanks for showing this...something to do on a cold winter night!
ReplyDeletePlanning to give this a go first thing tomorrow morning - beads selected, laid out and ready to go. Thanks for the tutorial. Will be following from now on! Anna
ReplyDeleteThat is so pretty! My mom has really gotten into jewlery making lately she will be thrilled. Thank you so much for making this
ReplyDeleteWow, thanks for posting this! This is a beautiful bracelet. I made one and it is pink and pearls. I will have that up on my blog later at craftybliggityblog.blogspot.com It was a little short so I used a chain to make up the difference.
ReplyDeletehttp://craftybliggityblog.blogspot.com/2012/06/twist-wire-bracelet.html
DeleteFabulous tutorial - will definitely have to give this one a go sometime soon!!
ReplyDeleteI will be trying this soon! Thanks for.posting this!
ReplyDelete